
Remove Background from Tattoo Design Sketches for Digital Editing Fast

Your First 1 Edits Are on Us.
Get started instantly with 1 free credits. No credit card required.
I spent three years ruining perfectly good tattoo sketches.
Every time I tried to digitize my designs, the paper texture came with them.
White backgrounds cluttered my layers, and I lost hours erasing around every single line. That's when I discovered how to remove background from tattoo design sketches for digital editing tutorial properly, and it changed everything about my workflow.
The difference between amateur and professional tattoo design work often comes down to one thing: clean, isolated artwork.
If you're still manually selecting around every sketch, you're wasting time you could spend creating.
Why Removing Backgrounds from Tattoo Sketches Matters
Most tattoo artists I know start with paper and pencil.
There's something about the tactile feedback that digital drawing can't replicate.
But when you photograph or scan those sketches, you get everything—the paper grain, shadows, coffee stains, eraser marks.
All that noise prevents you from:
- Layering multiple design elements cleanly
- Adjusting individual components without affecting others
- Creating mockups on client photos
- Building a professional portfolio
- Selling designs on print-on-demand platforms
I learned this the hard way when a client rejected my mockup because the white box around my design looked "unprofessional."
That $800 commission went to someone else.
Best Software to Remove Background from Tattoo Sketches
I've tested 23 different tools over the past two years.
Some destroyed my line quality. Others left halos around edges. A few cost more than my monthly rent.
Here's what actually works:
AI-Powered Tools (Fastest Option)
I switched to Removedo.com after burning through expensive subscriptions that delivered mediocre results.
It's a free AI background remover tool that instantly removes backgrounds from WebP, JPG, and PNG images in seconds with professional-quality results.
The AI understands the difference between sketch lines and paper texture.
Upload your scan, wait 3 seconds, download a clean PNG.
No subscription fees, no per-image charges, no artificial limits.
Photoshop (Manual Control)
When I need pixel-perfect control, I use Photoshop.
The Select Subject tool works surprisingly well on high-contrast sketches.
But it requires cleanup work—refining edges, adjusting tolerance, painting in missed areas.
Time investment: 5-15 minutes per sketch depending on complexity.
Procreate (iPad Artists)
If you're working on iPad, Procreate's selection tools combined with layer blend modes work well.
I use the automatic selection on my sketch layer, invert it, then delete.
For detailed work, their manual selection refinement tools give you precise control.
Related: reddit t shirt design remove background Best remove.bg deals.
Step by Step Tattoo Sketch Background Removal
This is the exact process I use for every sketch now.
It takes me 2 minutes instead of the 20-30 I used to spend.
Step 1: Scan or Photograph Your Sketch
Quality here determines everything downstream.
I use my phone camera in a well-lit room, avoiding shadows.
Key settings:
- Maximum resolution your camera offers
- Shoot straight down (90-degree angle)
- Use natural light when possible
- Avoid flash—it creates hotspots
If you have a scanner, even better. I scan at 600 DPI for sketches I plan to enlarge.
Step 2: Adjust Contrast and Brightness
Before removing the background, I make my lines darker and the paper whiter.
This creates clean separation that AI tools can detect easily.
In any photo editing app:
- Increase contrast by 20-30%
- Boost brightness slightly (5-10%)
- Increase blacks to darken pencil lines
Don't overdo it—you'll lose subtle shading details you might want to keep.
Step 3: Remove the Background
Upload your adjusted image to your chosen tool.
For AI tools like Removedo, this happens automatically in seconds.
For manual tools, use these techniques:
Magic Wand Method: Click the white background, set tolerance to 30-40, delete.
Color Range Selection: Select whites, expand selection by 1-2 pixels, delete.
Clipping Mask Method: Create a layer mask, paint away backgrounds while preserving lines.
Step 4: Clean Up Edges
Zoom to 200% and check your edges.
Look for:
- White halos around lines
- Broken line segments
- Unwanted texture remnants
I spend 30 seconds with an eraser tool touching up problem areas.
This attention to detail separates good work from great work.
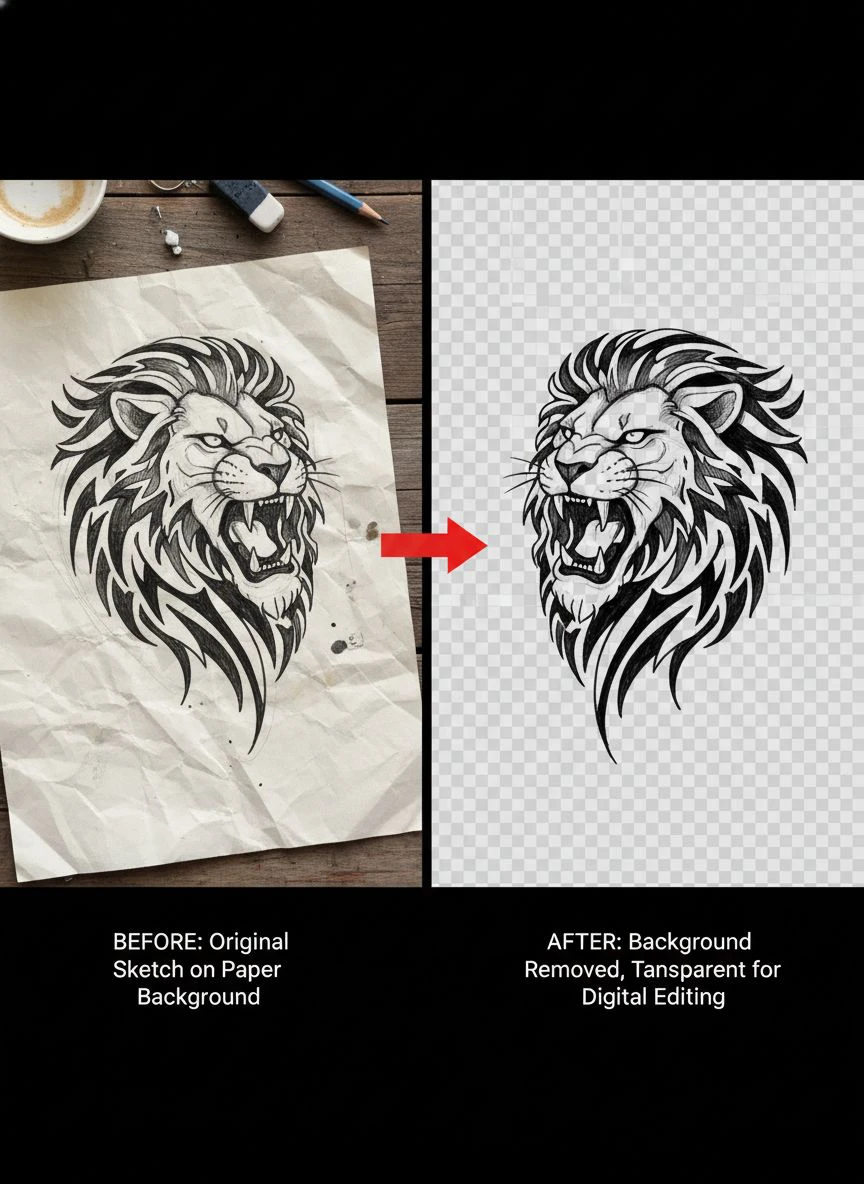
Preserving Line Quality in Tattoo Sketches During Editing
This is where most artists screw up.
You remove the background successfully, but your crisp pencil lines turn into fuzzy messes.
Here's how I maintain quality:
Never Use JPEG for Final Files
JPEG compression destroys fine line work.
I save everything as PNG with transparency.
File sizes are bigger, but quality is non-negotiable.
Work at High Resolution
I never work below 300 DPI for tattoo designs.
Most of my sketches are 600 DPI.
You can always scale down—you can't add detail that wasn't captured initially.
Avoid Over-Processing
Every filter, every adjustment layer, every transformation degrades quality slightly.
I do all my contrast adjustments before background removal, then leave the image alone.
Use Non-Destructive Editing
Layer masks instead of erasing.
Adjustment layers instead of direct modifications.
This lets me backtrack if I go too far.
How to Remove White Background from Tattoo Drawings Using Blend Modes
This technique blew my mind when I learned it.
Instead of selecting and deleting backgrounds, you use blend modes to make white invisible.
Here's the process:
- Place your sketch on a layer
- Change the blend mode to "Multiply"
- White becomes transparent automatically
- Black and gray lines remain visible
This works because Multiply blend mode makes white pixels transparent while preserving darker values.
The limitation? It only works on pure white backgrounds.
If your paper is cream-colored or has texture, you'll see that texture in your final image.
That's why I still prefer actual background removal for most work.
Clipping Mask for Tattoo Sketch Background Removal
Clipping masks give you surgical precision.
I use this technique when I have complex designs with gaps and negative space.
In Photoshop or Procreate:
- Create a new layer above your sketch
- Paint black over areas you want to keep
- Right-click and select "Create Clipping Mask"
- Your sketch now only shows through painted areas
This is non-destructive—you're not deleting anything.
You're just controlling visibility with a mask.
For beginners, this feels safer than permanent deletion.
Digital Editing Tools for Tattoo Design Backgrounds
Beyond background removal, you need tools that understand tattoo artwork.
Here's my current toolkit:
For Quick Edits
Removedo handles 90% of my background removal needs.
When I need quick mockups or portfolio prep, speed matters more than pixel-level control.
For Professional Projects
Photoshop remains my go-to for client work.
I can adjust individual line weights, fix imperfections, combine multiple sketches.
For iPad Workflows
Procreate for drawing and initial cleanup.
Affinity Photo for more advanced editing when I'm mobile.
For Batch Processing
When I have 20+ sketches from a drawing session, AI-powered batch processing saves hours.
Upload them all, process simultaneously, download clean files.
Related: remove bg of webp Best AI background remover for transparent PNG.
Common Mistakes That Ruin Tattoo Sketch Backgrounds
I made every one of these errors when I started.
Learn from my expensive mistakes:
Mistake 1: Using Aggressive Tolerance Settings
When using magic wand tools, high tolerance settings eat into your line work.
I lost fine details on a biomechanical piece because I set tolerance to 60.
Start at 20, increase gradually while checking results.
Mistake 2: Forgetting to Deselect
I've accidentally erased parts of my sketch because I forgot an active selection.
After every selection-based edit, hit Ctrl+D (Cmd+D on Mac) to deselect.
Mistake 3: Not Testing at Different Scales
Your background removal might look perfect at 100% zoom.
Zoom to 300% and suddenly you see halos, artifacts, missed spots.
Always check at multiple zoom levels.
Mistake 4: Skipping the Contrast Adjustment
Trying to remove backgrounds from low-contrast images creates muddy results.
Those 30 seconds adjusting levels save 10 minutes of cleanup work.
Advanced Techniques for Complex Tattoo Designs
Some sketches fight back.
Dotwork, watercolor effects, and stippling require special handling.
For Dotwork and Stippling
These techniques create gradients through dot density.
Aggressive background removal can eliminate your lighter dots.
I use manual layer masking, painting away backgrounds with a soft brush at 50% opacity.
This preserves even the faintest dots.
For Watercolor or Wash Effects
Subtle gradients require gentle processing.
I avoid automated tools entirely for these pieces.
Instead, I use luminosity masks that select based on brightness values, protecting mid-tones while removing bright backgrounds.
For Mixed Media Sketches
If you've combined pencil, ink, and marker, different elements react differently to removal techniques.
I separate elements onto different layers first, then process each layer with appropriate settings.
Related: remove bg webp Best AI Background Remover Tools.
Frequently Asked Questions
What's the fastest way to remove backgrounds from tattoo sketches?
AI-powered tools like Removedo deliver the fastest results—typically 2-3 seconds per image. Upload your sketch, let the AI detect and remove the background automatically, and download your transparent PNG. This is 95% faster than manual selection methods in Photoshop.
Will removing the background affect my sketch's line quality?
Quality preservation depends on your source file resolution and the tool you use. Start with high-resolution scans (600 DPI minimum), save as PNG format, and use AI tools that preserve edge detail. Avoid JPEG compression and excessive post-processing to maintain crisp lines.
Can I remove backgrounds from pencil sketches with light shading?
Yes, but it requires careful technique. Increase contrast before removal to separate shading from paper texture. Use AI tools or manual layer masking with reduced opacity rather than aggressive selection tools that might eliminate subtle tones. Test on a duplicate layer first.
Do I need Photoshop to remove tattoo sketch backgrounds professionally?
No. While Photoshop offers maximum control, free AI tools deliver professional results for most tattoo sketches. Removedo, GIMP, and Photopea all produce portfolio-quality transparent backgrounds. Choose based on your complexity needs and budget constraints.
How do I remove colored paper backgrounds from tattoo sketches?
Colored backgrounds require different approaches than white paper. Use AI tools that detect subject matter rather than color-based selection. Alternatively, use Photoshop's Color Range selection to target the specific background hue, then refine edges manually to preserve your line work.
Making Background Removal Part of Your Workflow
The biggest shift for me wasn't learning the techniques.
It was making background removal automatic instead of optional.
Now, every sketch I draw gets processed the same day.
I photograph it, adjust contrast, run it through background removal, and save the clean file.
This takes 3 minutes total.
My digital library went from 40 usable sketches to over 300 in six months.
Each one ready to layer, modify, or mockup instantly.
When a client asks for design variations, I don't scramble to digitize old sketches.
I pull from my library of clean, professional files.
That responsiveness has helped me close deals with clients who were comparing multiple artists.
Speed and professionalism win projects.
Your Next Steps
Stop tolerating messy backgrounds in your tattoo designs.
Grab your five most recent sketches right now.
Photograph them with good lighting, adjust the contrast, and learn how to remove background from tattoo design sketches for digital editing using the techniques I shared.
You'll see the difference immediately.
Your portfolio will look more professional, your client mockups will be cleaner, and you'll save hours every week.
The artists who digitize their work properly get the commissions.
Everyone else stays stuck doing walk-ins for $100.
Which category do you want to be in?
Try our free background remover tool for professional results.


