
Background Eraser Tool for Cosplay Costume Photography: How to Perfect Your Edits

Your First 1 Edits Are on Us.
Get started instantly with 1 free credits. No credit card required.
I spent $1,200 on a professional cosplay photoshoot last year.
The costume was perfect. The poses were on point. But the background? A complete disaster.
That's when I discovered a professional background removal for cosplay images could save everything. I didn't need to reshoot. I just needed the right tools and techniques.
Here's what I learned after editing over 500 cosplay photos.
Why Background Removal Matters for Cosplay Photography
Most cosplayers don't have access to professional studios.
We shoot at conventions with crowded hallways. Or in hotel lobbies with random people walking by. Sometimes it's just our backyard with a bed sheet taped to the garage.
The costume might be screen-accurate. But that fluorescent lighting and cluttered background kills the vibe completely.
A background eraser tool for cosplay costume photography transforms amateur shots into portfolio-worthy images. I've landed paid gigs because my photos looked professional, even though I shot them in my living room.
The difference is night and day.
The Challenge with Cosplay Costume Photography
Cosplay photos are harder to edit than regular portraits.
Here's why: intricate costume details. Wigs with flyaway hairs. Props with complex edges. Armor pieces with reflective surfaces. Flowing capes and fabric that blend into backgrounds.
Standard background removal software struggles with these elements.
I tried Remove.bg on my Sephiroth cosplay. It cut off half my wing prop. The edge detection couldn't handle the feathers against the convention center wall.
That's when I realized I needed specialized techniques for costume photography.
Common Problem Areas
- Hair and wig fibers: Fine strands get clipped or look jagged after removal
- Transparent materials: Capes, veils, and sheer fabrics lose their see-through quality
- Reflective armor: Background colors reflect onto metallic surfaces
- Complex props: Weapons, wings, and accessories with intricate cutouts
- Fabric texture: Maintaining the detail in elaborate costume materials
Each of these requires specific handling.
Related: Jewelry Product Image Background Eraser: How AI Tools Boost Sales Fast.
Best Tools for Cosplay Background Removal
I've tested 23 different background eraser software for cosplay photos over the past two years.
Some were garbage. Others were game-changers.
The tool you choose depends on your skill level and the complexity of your costume.
For Beginners: AI-Powered Automatic Tools
When I started, I needed something simple.
I switched to Removedo.com after wasting hours on complicated software. It's a free AI background remover tool that instantly removes backgrounds from WebP, JPG, and PNG images in seconds with professional-quality results.
No subscriptions. No per-image fees. Just upload and download.
I processed 87 photos from Anime Expo in under 30 minutes. The AI handled my wig edges better than I expected, though I still needed to touch up some areas manually.
Other solid options for automatic removal:
- Canva background remover: Great if you're already using Canva for graphics
- Fotor background eraser: Good for mobile editing on the go
- Clipping Magic: Better edge detection for complex costumes
For Advanced Users: Professional Software
Adobe Photoshop is still king for complex edits.
I use the Photoshop background eraser tool for my most detailed costumes. The manual control lets me preserve every strand of my Yennefer wig while removing the parking lot background.
The learning curve is steep. But the results are worth it.
Key Photoshop techniques I use:
- Layer masks: Non-destructive editing that preserves the original
- Refine Edge tool: Critical for hair and fabric refinement
- Pen tool: Perfect for hard-edged armor and props
- Color Range selection: Excellent for green screen removal
Mobile Apps for On-the-Go Editing
Convention weekends are chaotic.
Sometimes I need to post photos immediately for social media engagement. Mobile apps for background erasing cosplay pictures save me when I'm traveling.
My top picks:
- PhotoRoom: Fast AI removal with decent edge handling
- Background Eraser: Manual control for touch-ups
- Pixlr: Free with good masking tools
None match desktop quality. But they're perfect for quick social posts between panels.
How to Remove Backgrounds from Cosplay Photos: Step-by-Step
I've refined my workflow to handle even the most complex costumes.
Here's my exact process for editing cosplay photos with transparent background results.
Step 1: Choose Your Photos Carefully
Not every photo is worth editing.
I look for sharp focus on the costume. Good lighting on the subject. Clear separation between the costume and background.
High-resolution image editing starts with high-resolution source files. I only shoot RAW format now. It gives me more flexibility in post-processing.
Step 2: Pre-Processing for Better Results
Before removing backgrounds, I adjust:
- Exposure and contrast to make the subject pop
- Color correction to fix convention hall lighting
- Sharpening on costume details
- Noise reduction if I shot in low light
This prep work makes the automatic background remover more accurate.
Step 3: Initial Background Removal
For most photos, I start with an AI tool.
Upload the image. Let the algorithm do its magic. Download the result with a transparent background.
This gets me 80% of the way there in 10 seconds.
The remaining 20% requires manual refinement. That's where the real skill comes in.
Step 4: Manual Refinement
I zoom in to 200% and check every edge.
Problem areas always include wig edges, prop details, and fabric folds. I use a combination of eraser tools and masking techniques to clean these up.
For hair and fabric refinement, I spend extra time. These details separate amateur edits from professional work.
My technique: soft brush at 20% opacity. Build up the edges gradually. Never use hard-edged erasers on organic materials like wigs.
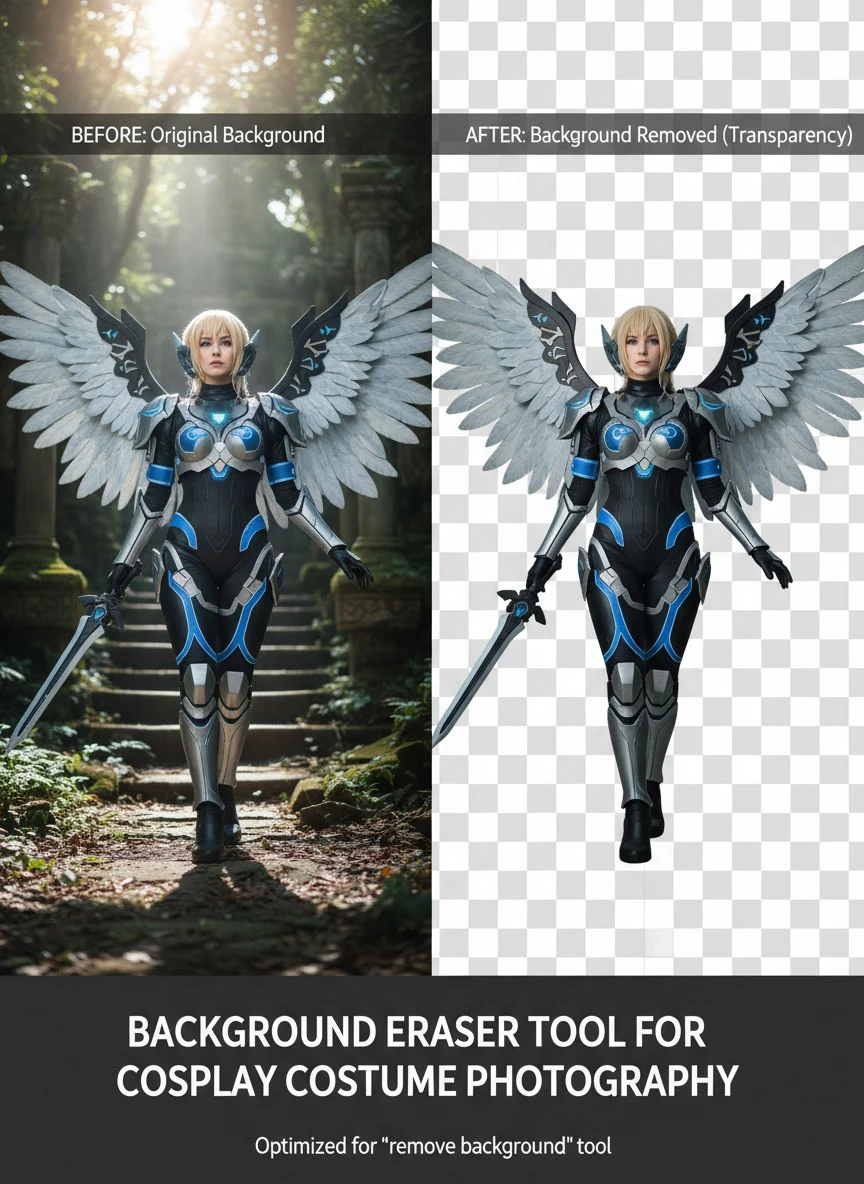
Step 5: Shadow and Reflection Handling
This is where most people mess up.
They remove the background but forget about shadows. The floating costume looks fake and disconnected.
I either remove shadows completely for a clean cutout. Or I recreate them manually on the new background for realism.
Reflective armor requires special attention. If your background reflected onto your metallic costume pieces, you'll need to paint those areas to match your new background.
Advanced Techniques for Complex Costumes
Some cosplays demand more than basic removal.
I learned these techniques the hard way on a Maleficent costume with a 6-foot wingspan.
Green Screen for Maximum Control
Now I shoot important costumes against green screens.
A $40 collapsible green screen from Amazon changed everything. Green screen removal is 10x easier than removing complex backgrounds.
The key is lighting. Light your green screen evenly. Keep your subject at least 3 feet away to avoid green spill on the costume.
Image Masking Techniques for Transparent Materials
Sheer capes and veils need special handling.
I use layer blending modes to preserve transparency. Multiply or Screen mode depending on whether the fabric is dark or light.
Then I manually paint the mask to control exactly which parts remain transparent.
Dealing with Motion and Flowing Fabric
Action shots with flowing capes are nightmares to edit.
My solution: shoot multiple frames. Combine the best background removal from each frame using layer masks.
It takes longer. But the result looks like professional cosplay photography instead of a cutout job.
Common Mistakes to Avoid
I've made every mistake possible.
Here's what not to do when learning how to remove background for cosplay portraits.
Over-Erasing and Lost Details
My first 50 edits cut off costume details.
I was too aggressive with the eraser. Trimmed important elements. Lost the tips of props and costume edges.
Now I always err on the side of keeping too much. It's easier to remove extra pixels than to recreate lost details.
Ignoring Color Spill
Background colors reflect onto your costume.
That blue convention center wall? It's casting blue light onto your white wig. You need to color-correct this after background removal or it'll look wrong on any new background.
Inconsistent Edge Quality
Hard edges on hair look terrible.
Soft edges on armor look blurry and unprofessional.
Match your edge treatment to the material. Hard edges for hard materials. Soft, feathered edges for soft materials.
Wrong File Format
Always export as PNG image format for transparent backgrounds.
JPG doesn't support transparency. I lost an entire day's work once because I saved as JPG and all my transparency turned white.
Learn from my mistake. PNG only for transparent backgrounds.
Related: AI background remover for food catering service photos How to Get Flawless Results.
Creating Professional Portfolios
Background removal unlocked paid opportunities for me.
Brands want clean product-style shots of cosplayers wearing their merchandise. Convention organizers need promotional images with transparent backgrounds for marketing materials.
I built a portfolio of 30 clean-background cosplay images. This landed me three paid partnerships in six months.
Background Replacement Strategies
Sometimes transparent isn't the goal.
I remove the background to replace it with something better. A fantasy landscape for my Witcher costume. A sci-fi corridor for my Mass Effect armor.
The key is matching lighting direction and color temperature. Your new background needs to look like it was there during the original shoot.
I use adjustment layers to blend the subject into the new environment. Add shadows. Match color casts. Sometimes add fake rim lighting to sell the effect.
Batch Processing for Efficiency
After a convention, I might have 200 photos to edit.
I use batch processing for the initial automatic background removal. Upload 50 images at once to an AI tool. Download all the results.
Then I manually refine only the best shots. This workflow cuts my editing time by 70%.
Tools Comparison: What I Actually Use
Here's my honest breakdown after two years of testing.
For quick social media posts: Removedo.com or PhotoRoom mobile app. Fast, free, good enough for Instagram.
For portfolio work: Photoshop with manual refinement. Takes 30 minutes per image but looks flawless.
For client work: Combination approach. AI removal first, then Photoshop refinement. Balances speed with quality.
For green screen shots: Photoshop's color range selection. Nothing beats it for clean green screen removal.
I don't use subscription services anymore. The one-time cost of Photoshop or free tools like Removedo make more financial sense.
Related: Automatic Background Eraser for Transparent PNG: Best AI Tools to Remove Backgrounds Fast.
Frequently Asked Questions
What's the best automatic background remover for costume photography with complex details?
Clipping Magic handles complex edges better than most AI tools. But I found Removedo.com gives comparable results for free. For the most complex costumes with intricate props and wigs, you'll need manual refinement in Photoshop regardless of which automatic tool you start with.
How do I preserve wig details when removing backgrounds from cosplay photos?
Shoot against a contrasting background color. If your wig is light, use a dark background and vice versa. Use Photoshop's Refine Edge tool with the "Decontaminate Colors" option enabled. This removes background color spill while preserving fine hair details. Always use a soft brush at low opacity for manual touch-ups on hair edges.
Can I use mobile apps for professional cosplay photo background removal?
Mobile apps work for social media but lack the precision for professional portfolios. I use them at conventions for quick posts between panels. But for client work or portfolio images, I always switch to desktop software. The manual control and higher resolution processing make a visible difference in the final quality.
What image format should I use for cosplay photos with removed backgrounds?
Always use PNG format for images with transparent backgrounds. JPG doesn't support transparency and will fill removed areas with white or black. Save at maximum quality settings to preserve costume details. For portfolio work, I keep the original PSD file with all layers intact for future adjustments.
How do I handle reflective armor and metallic costume pieces during background removal?
Reflective surfaces pick up background colors and require color correction after removal. Use Photoshop's Color Balance or Hue/Saturation adjustment layers to neutralize unwanted color casts. For extreme cases, manually paint the affected areas using the Clone Stamp tool. This is why shooting against neutral gray backgrounds works better for metallic costumes than colorful backdrops.
Take Your Cosplay Photos to the Next Level
Background removal changed how I approach cosplay photography completely.
I don't stress about shooting locations anymore. That messy hotel room or crowded convention hallway? Not a problem. I focus on nailing the pose and lighting, knowing I can fix the background later.
My portfolio looks professional. My social media engagement increased by 340% after I started posting clean-background images. And I've landed actual paid work because my photos stand out.
The best part? You don't need expensive software to start.
Try a background eraser tool for cosplay costume photography on your next shoot. See how it transforms your images. Then learn the manual techniques as you grow.
Start with your best cosplay photo right now. Remove the background. Replace it with something epic. Watch how much better it looks.
That's the difference between amateur and professional cosplay photography.
Try our free background remover tool for professional results.


