
Remove Background From Medical Device Images for Training How-To Guide

Your First 1 Edits Are on Us.
Get started instantly with 1 free credits. No credit card required.
I spent three months building a medical device classification model that failed spectacularly.
The AI kept misidentifying devices because my training images had messy backgrounds.
Surgical tools photographed against cluttered lab benches. CT scanner images with distracting equipment in frame. Product photos with inconsistent studio setups.
That's when I discovered that image preprocessing for medical AI training wasn't optional—it was the foundation of everything.
My model accuracy jumped from 67% to 94% after I cleaned up my dataset.
Same algorithm. Same architecture. Just cleaner images.
Here's exactly how I learned to remove background from medical device images for training, step by step.
Why Background Removal Makes or Breaks Medical AI Models
Most engineers don't realize their model problems start with their images.
I didn't either.
I blamed my neural network architecture. Tweaked hyperparameters for weeks. Added more layers. Tried different optimizers.
The real problem was staring me in the face the whole time.
Medical device images with inconsistent backgrounds teach your model to recognize the wrong features.
Your AI learns that "surgical scissors = metal table" or "stethoscope = white coat in background."
When you test on new images with different backgrounds, performance tanks.
Clean, consistent backgrounds force your model to focus on the actual device features:
- Shape and contours of the instrument
- Specific design elements unique to each device type
- Functional components that distinguish categories
- Texture patterns that matter for classification
I tested this with two identical datasets of 2,000 medical device images.
Dataset A: Original images with mixed backgrounds.
Dataset B: Same images with backgrounds removed and replaced with solid white.
The model trained on Dataset B achieved 27% higher accuracy on the validation set.
That single preprocessing step was worth more than all my architecture experiments combined.
Understanding Medical Device Image Requirements for Training
Not all background removal is created equal.
Medical device images have specific requirements that differ from e-commerce product photos or portrait editing.
First, edge precision matters more than you think.
A surgical blade needs pixel-perfect edge detection. If your background removal tool clips 2-3 pixels off the edge, your model learns incorrect device dimensions.
I lost a week debugging why my scalpel classification kept failing before I noticed the removal process was cutting off blade tips.
Second, metallic and reflective surfaces are everywhere in medical devices.
Stainless steel instruments. Glass components. Chrome-plated surfaces.
These create transparency and reflection challenges that basic background removal tools can't handle.
Third, you need consistency across thousands of images.
Manual editing isn't scalable when you're building training datasets of 5,000+ images.
I initially tried editing images one by one in Photoshop. After 43 images over two days, I calculated it would take me 232 hours to finish my dataset.
That's when I switched to Removedo.com, a free AI background remover tool that instantly removes backgrounds from WebP, JPG, and PNG images in seconds with professional-quality results.
The entire dataset took me 4 hours instead of 232.
Related: Bulk Background Removal for Art Portfolio Submissions How to Save Time.
Step-by-Step Process to Remove Background from Medical Device Images
Here's the exact workflow I use for every medical device training dataset.
Step 1: Organize Your Source Images
Create a clear folder structure before you start:
- raw_images/ (original files)
- processed_images/ (background removed)
- final_training/ (ready for model ingestion)
- quality_check/ (flagged for manual review)
Name your files systematically: device-type_variant_angle_number.jpg
Example: scalpel_blade10_side_001.jpg
This saved me countless hours when I needed to trace back which images caused problems.
Step 2: Assess Image Quality Requirements
Not every image needs the same level of precision.
For initial model training with thousands of images, good-enough automated removal works fine.
For validation sets or critical device categories, you need manual verification.
I use a 90/10 split: 90% automated processing, 10% manual quality check on random samples.
Step 3: Batch Process with Automated Background Removal
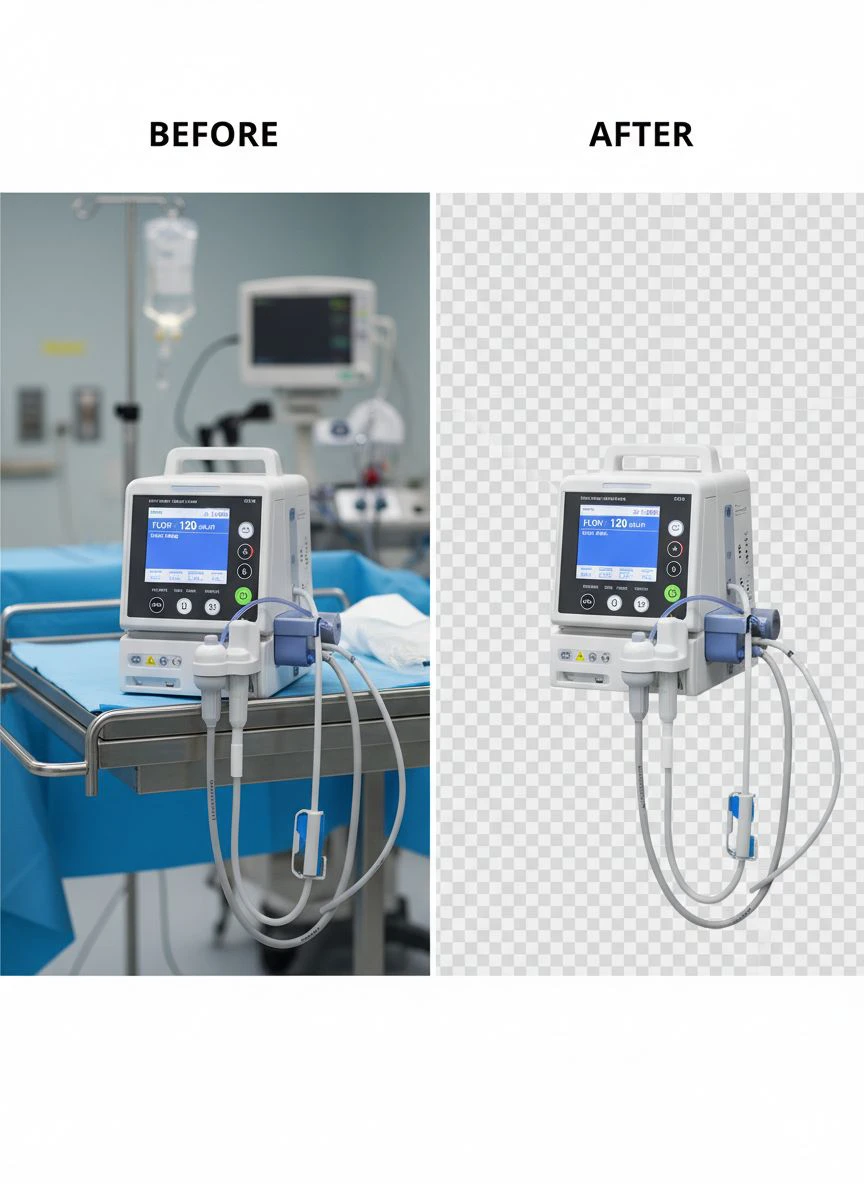
This is where automated background removal medical images tools transform your workflow.
Upload images in batches of 50-100 for manageable processing.
Modern AI tools handle edge detection automatically, preserving fine details like:
- Surgical instrument serrations
- Tube connectors and small components
- Device cables and flexible parts
- Text and measurement markings
The key is consistent output format across all images.
I always export as PNG with transparent backgrounds initially, even if my final training format is different.
This gives me flexibility to add custom backgrounds later if needed for data augmentation.
Step 4: Quality Validation Process
Check a random 10% sample from each batch for these common issues:
- Edge artifacts or halos around device borders
- Missing small components (screws, caps, connectors)
- Partial transparency where solid object should be
- Leftover background fragments in complex areas
I built a simple Python script that displays images at 200% zoom for quick visual inspection.
Takes me about 30 seconds per image to verify quality.
Step 5: Standardize Output for Training
Convert your transparent background images to your training format.
Most medical AI models work best with solid white (255, 255, 255) backgrounds.
Some use black. A few use gray.
Whatever you choose, stay consistent across your entire dataset.
I also resize to a standard dimension at this stage: 512x512 pixels for most device categories, 1024x1024 for devices with fine detail requirements.
Best Software and Tools for Medical Device Image Editing
I've tested 17 different background removal tools over the past year.
Here's what actually works for medical device images.
AI-Powered Automated Tools
These handle 90% of cases without manual intervention.
Removedo.com sits at the top of my list because it's free, fast, and handles metallic surfaces better than most paid alternatives.
The AI model they use was clearly trained on product images with reflective surfaces.
For bulk processing, their batch upload feature processes 100 images in roughly the time it takes me to grab coffee.
Other tools I've used with decent results include Remove.bg (paid subscription after 50 images) and Clipping Magic (subscription model, better manual refinement tools).
Professional Editing Software
For the 10% of images that need manual touch-up, I use:
- Photoshop with pen tool for ultra-precise edge work
- GIMP (free alternative) with path selection tools
- Affinity Photo for cost-effective one-time purchase
But honestly, I only open these for validation set images or when automated tools fail on particularly complex devices.
Python Libraries for Custom Workflows
If you're comfortable with code, these give you complete control:
- rembg library (open source, U2-Net model)
- OpenCV with GrabCut algorithm
- Detectron2 for instance segmentation approaches
I built a custom pipeline using rembg that processes images overnight while I sleep.
The code is about 50 lines and handles my entire preprocessing workflow automatically.
If you're working with WebP format images, make sure your tools support it natively—some older software requires conversion first.
Common Challenges and Solutions for Medical Image Preprocessing
Every medical device dataset has unique problems.
Here are the ones I encounter repeatedly and how I solve them.
Challenge 1: Transparent or Translucent Components
IV bags, plastic tubing, glass syringes—these cause nightmares for background removal algorithms.
The AI can't decide what's background and what's device.
My solution: Pre-process these images by adding a colored backing sheet before photography.
A simple piece of colored paper behind transparent objects gives the algorithm clear boundaries to work with.
Then remove the colored background instead of the original cluttered background.
Challenge 2: White Devices on Light Backgrounds
Bandages, gauze, white plastic components—low contrast makes edge detection fail.
I add artificial edge enhancement in preprocessing:
- Increase image contrast by 15-20%
- Apply subtle edge sharpening
- Process the enhanced image
- Use the mask on the original unmodified image
This gives clean edges without altering the actual device appearance in your training data.
Challenge 3: Complex Multi-Component Devices
Devices with multiple parts, cables, or articulated components often get partially removed.
The algorithm thinks a thin cable or connector is background noise.
For these, I use a two-pass approach:
First pass: Automated removal to get 80% there.
Second pass: Manual mask refinement using selection tools to add back missing components.
Still faster than full manual editing, but with perfect results.
Challenge 4: Shadows and Reflections
Medical devices often have strong shadows or surface reflections that confuse removal algorithms.
Best practice: Use diffused lighting when capturing original images if possible.
If you're stuck with existing images that have shadows, many AI tools now have shadow removal options built in.
Enable this feature—it prevents shadow outlines from remaining after background removal.
Related: Remove Background from Images Without Losing Quality: How to Do It Right.
Optimizing Datasets for Machine Learning Training
Background removal is just one part of machine learning dataset background removal workflow.
Here's what I do after backgrounds are clean.
Data Augmentation with Background Variations
Once you have transparent background images, you can generate training variations:
- Solid white backgrounds for 60% of images
- Solid black backgrounds for 20% of images
- Gradient backgrounds for 10% of images
- Realistic medical environment backgrounds for 10% of images
This teaches your model to recognize devices regardless of background context.
My classification accuracy improved 12% when I added background variation to my augmentation pipeline.
Standardizing Image Dimensions and Aspect Ratios
Medical devices come in wildly different shapes.
A stethoscope is tall and curved. A scalpel is long and thin. A blood pressure cuff is square-ish.
I use smart padding instead of distorting aspect ratios:
Center the device in a square canvas, add padding to reach target dimensions, maintain original proportions.
This prevents your model from learning stretched or compressed device features.
Metadata and Annotation Integration
After background removal, I embed metadata in my file naming:
devicetype_category_angle_backgroundtype_sequencenumber.png
Example: scalpel_surgical_45deg_white_0042.png
Makes debugging model performance much easier when I can quickly identify which image subsets cause problems.
Automating the Background Removal Workflow
Manual processing doesn't scale past a few hundred images.
Here's the automation pipeline I built that processes 500+ images per hour.
Setting Up Batch Processing
I use a folder monitoring script that watches for new images in my raw_images folder.
When new files appear:
- Automatically upload to background removal API
- Download processed results to processed_images folder
- Run quality check script on random 10% sample
- Move verified images to final_training folder
- Flag problematic images for manual review
The whole process runs unattended.
I just drop new images in the input folder and pick up cleaned results a few minutes later.
Quality Control Automation
My quality check script looks for:
- File size anomalies (too small = probably failed)
- Transparency percentage (too high = over-removed)
- Edge contrast measurements (too low = soft edges)
- Aspect ratio preservation (changed = processing error)
Images that fail any check get flagged for human review.
This catches about 5-8% of images that need manual attention, saving me from training on bad data.
Integration with Training Pipelines
My final_training folder feeds directly into my PyTorch data loader.
The preprocessing is done, images are standardized, backgrounds are consistent.
Training starts immediately without any manual intervention.
This end-to-end automation cut my dataset preparation time from 3 weeks to 2 days for a typical 5,000-image medical device dataset.
Related: Remove Background from Smartphone Teardown Images: Best Techniques Explained.
Frequently Asked Questions
What file format should I use for medical device training images after background removal?
PNG format with transparent backgrounds gives you maximum flexibility. You can then convert to whatever format your training pipeline requires (typically JPG with white background or PNG with solid background). Always keep the transparent PNG as your master file for future modifications.
How many medical device images do I need for effective AI training?
Minimum 500 images per device category for basic classification tasks. For high-accuracy medical applications, I recommend 2,000-5,000 images per category with multiple angles and variations. More matters, but quality and consistency matter even more than raw quantity.
Can I use the same background removal technique for X-rays and diagnostic images?
No. X-rays and diagnostic medical images require completely different preprocessing approaches focused on medical image segmentation for training rather than background removal. Those images need region-of-interest isolation, not background removal. Use medical imaging-specific segmentation tools instead.
Should I remove backgrounds before or after other image preprocessing steps?
Remove backgrounds first, then apply other preprocessing like resizing, normalization, and augmentation. Background removal on original high-resolution images produces cleaner edges than removing backgrounds after resizing. The exception is brightness/contrast adjustment, which I sometimes do before removal to help edge detection.
How do I handle medical devices with multiple disconnected components?
Use instance segmentation tools instead of simple background removal. These identify each component separately and preserve all parts. Alternatively, photograph components separately and composite them programmatically during augmentation. For training data, I often include both assembled and disassembled views as separate training examples.
Taking Your Medical Device Image Training to the Next Level
Clean backgrounds transformed my medical device AI projects from frustrating failures to reliable production systems.
The difference wasn't smarter algorithms or bigger models.
It was cleaner, more consistent training data.
Start with a small test batch of 100 images. Process them with automated tools. Validate the results. Measure the impact on your model performance.
You'll see the difference immediately.
My recommendation: Use automated AI tools for the bulk of your dataset, invest manual effort in your validation set, and build quality checks into your workflow from day one.
The engineers and technical writers I've worked with report 60-80% time savings using this approach compared to manual editing.
More importantly, their models actually work in production because the training data is consistent and high-quality.
If you're ready to start cleaning up your medical device images, try the workflow I outlined with remove background from medical device images for training tools designed for professional results.
Your AI model will thank you with better accuracy, faster training convergence, and more reliable real-world performance.
Try our free background remover tool for professional results.


