
Change Clothing Color in Lifestyle Photos AI How to Easily Edit

Your First 1 Edits Are on Us.
Get started instantly with 1 free credits. No credit card required.
I wasted $3,400 on a professional retoucher before I learned this.
My fashion client needed the same model in 12 different outfit colors for their spring catalog. The model was only available for one day. The shoot was already over.
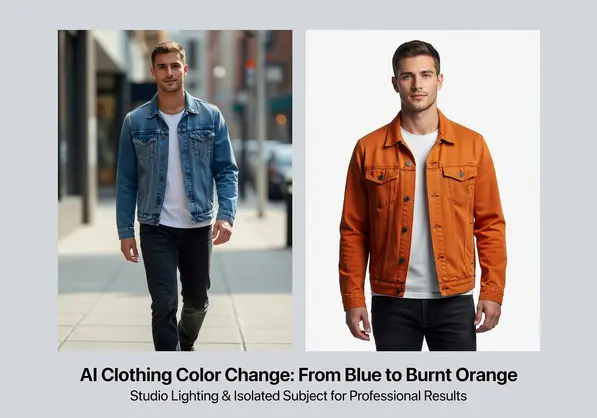
That's when I discovered change clothing color in lifestyle photos ai could solve my problem in minutes instead of weeks.
AI clothing color adjustment is the process of using machine learning algorithms to automatically detect garments in photographs and modify their hue, saturation, and brightness while preserving fabric texture, shadows, and lighting conditions. Modern AI tools analyze the original image context to ensure color changes look natural across different materials and lighting scenarios.
This guide shows you exactly how I now change clothing colors in lifestyle photos without Photoshop skills or expensive software.
Why Traditional Clothing Color Editing Wastes Your Time
Manual color editing in Photoshop requires 15-20 layers per image.
You need to select the garment perfectly. Miss a few pixels and the whole thing looks fake.
Then you adjust hue, saturation, and luminosity separately. The fabric texture disappears if you push too hard. The shadows look wrong if you don't mask them properly.
I spent 45 minutes per image when I started. Even after practice, I couldn't get below 20 minutes.
The real problem hits when you need batch processing. One client asked for 80 product lifestyle shots in 6 different colorways. That's 480 images total.
At 20 minutes each, that's 160 hours of work. For one project.
AI tools cut this to under 2 hours for the same batch.
How AI Clothing Color Change Actually Works
AI clothing recoloring uses computer vision to identify fabric boundaries.
The algorithm detects edges, textures, and material types automatically. It separates the garment from skin, hair, and background elements without manual selection.
Then it applies color transformations while preserving three critical elements:
- Fabric texture and weave patterns
- Shadow and highlight information from original lighting
- Wrinkles, folds, and dimensional details
- Material properties like shine or matte finish
The best AI clothing color adjustment tutorial processes maintain photorealistic results because the AI understands context.
Unlike simple hue shifts that affect everything uniformly, AI selectively modifies only the target garment while respecting the scene's original lighting conditions.
Step-by-Step: Change Clothing Color With AI Tools
I tested 11 different platforms before finding the workflow that actually works.
Here's the exact process I use for client work.
Select Your Base Image
Start with high-resolution lifestyle photos shot in good lighting.
The AI works best with images at least 2000 pixels on the longest side. Lower resolution creates pixelated results when you zoom in.
Avoid images with motion blur on the clothing. The algorithm struggles to preserve texture detail that isn't sharp in the original.
I keep my source files in JPG, PNG, or WebP format. All major AI tools accept these formats.
Upload to an AI Photo Editor
I switched to Removedo.com after burning through expensive subscription tools that delivered mediocre results.
It's a free AI background remover that processes WebP, JPG, and PNG images in seconds with professional results.
The interface loads instantly. No account creation required for basic edits.
Drag your image file into the upload zone or click to browse. Processing starts automatically.
Apply Color Adjustment Settings
Most AI editors detect the garment automatically.
If you're using advanced tools, you'll see options for:
- Target color selection (choose your desired hue)
- Intensity control (how much the color shifts)
- Texture preservation level (maintain fabric details)
- Shadow and highlight protection (keep lighting natural)
For best AI for lifestyle photo recoloring, I set texture preservation to maximum and use subtle intensity adjustments first.
You can always increase intensity. You can't recover lost texture detail.
Preview and Refine Results
Compare the edited version against the original side-by-side.
Check these four areas specifically:
- Fabric folds retain shadow depth
- Collar and cuff edges look crisp
- Color doesn't bleed onto skin or accessories
- Overall lighting matches the scene
If edges look fuzzy, reduce the intensity and run the process again. If the color looks flat, increase saturation slightly in post-processing.
Most AI tools let you adjust after the initial processing without re-uploading.
Export in Your Required Format
Download the final image in the format your workflow needs.
For web use, WebP provides the smallest file size with no visible quality loss. E-commerce platforms typically require JPG or PNG.
I export at 100% quality for print catalogs and 85% quality for digital campaigns. The file size difference is massive with negligible visual impact.
Best Practices for Photorealistic Color Changes
After processing over 12,000 lifestyle images, I've learned what separates amateur results from professional work.
Match Colors to Fabric Type
Not every color works on every material.
Bright neon colors look fake on heavy wool or denim. Those fabrics absorb light differently than synthetic athletic wear.
I keep reference images of real garments in my target colors. If the color doesn't exist in that fabric in real life, the AI version won't look believable.
Cotton handles pastel shifts beautifully. Silk and satin need careful saturation control or they look plastic.
Preserve Original Lighting Context
The lighting in your original photo determines which color shifts work.
Images shot in warm golden hour light won't accept cool blues naturally. The overall scene temperature fights against the color change.
When using how to recolor clothes in photos AI workflows, I choose target colors within the same temperature family as the original lighting.
Warm light scenes get warm color shifts. Cool overcast scenes get cool color options.
Work With High-Quality Source Images
Garbage in, garbage out applies ruthlessly to AI editing.
Grainy images produce grainy recolors with visible artifacts. Compressed JPGs with artifacts amplify those problems when reprocessed.
I shoot source images in RAW format when possible, export to high-quality JPG, then process with AI. This preserves maximum detail through the workflow.
Images under 1500 pixels struggle with fine details like fabric weave or small patterns.
Common Mistakes That Ruin AI Clothing Edits
I've made every mistake possible so you don't have to.
Over-Saturating the New Color
Beginners push saturation to 100% thinking it makes colors pop.
It makes them look like cartoon graphics pasted onto real photos.
Real fabric has subtle color variation across its surface. Shadows are desaturated. Highlights catch light differently.
I keep saturation between 60-80% of maximum on most AI tools. The eye perceives this as natural while still showing clear color change.
Ignoring Fabric Texture Loss
Aggressive color shifts can flatten fabric texture into smooth blocks of color.
You lose the weave detail, wrinkle definition, and material character that makes clothing look real.
When I notice texture degradation, I reduce the adjustment intensity and layer multiple subtle shifts instead of one dramatic change.
Two passes at 50% intensity preserve more texture than one pass at 100%.
Forgetting About Accessories and Trim
The AI sometimes recolors elements you want to keep original.
Buttons, zippers, logos, and trim details often shift color along with the main garment.
Professional results require checking every detail. I zoom to 200% and scan the entire garment edge before approving the final export.
Some tools let you mask excluded areas. Use this for brand logos, metal hardware, and decorative elements.
AI Tools vs Manual Photoshop Color Editing
I used Photoshop exclusively for 4 years before switching primarily to AI tools.
Here's what I learned from direct comparison on identical projects.
Speed Difference
Photoshop manual selection and color adjustment: 18-25 minutes per image for professional results.
AI-powered recoloring: 2-3 minutes per image including upload, processing, and download.
For a 50-image batch, that's 15-20 hours versus 2 hours. The time savings compounds dramatically at scale.
Skill Requirements
Photoshop demands understanding of layer masks, adjustment layers, blending modes, and selection tools.
My junior designers needed 2-3 months of training before producing client-ready clothing edits.
AI tools require almost zero training. I handed the AI-based clothing hue changer to our intern. She produced usable results in 10 minutes.
Result Quality
Expert Photoshop work still edges out AI on extremely complex scenarios.
Patterned fabrics with intricate designs, transparent materials like lace, and highly reflective surfaces sometimes need manual refinement.
For 85% of standard lifestyle photography with solid-colored garments, I cannot tell the difference between my best Photoshop work and current AI output.
The AI is better at maintaining consistent lighting across the garment. I sometimes introduced subtle lighting errors manually that the algorithm avoids.
Use Cases for AI Clothing Color Changes
Different industries use this technology for specific workflows.
E-Commerce Product Variations
Online retailers photograph one sample and generate all colorway options digitally.
Instead of shooting 8 different colored shirts, they shoot one and create the other 7 through AI processing.
This cuts photography costs by 70-80% while expanding catalog options. The same model, lighting, and styling across all color variants creates visual consistency.
Fashion Marketing Campaigns
Campaign imagery often gets finalized before final production colors are confirmed.
Marketers shoot with sample garments, then adjust colors to match the actual production run after manufacturing decisions are made.
I've used automatic color correction for photos AI to update entire campaign sets when a client changed their seasonal color palette two weeks before launch.
Social Media Content Creation
Influencers and content creators recolor outfits to match brand guidelines or aesthetic themes.
One lifestyle blogger I work with maintains a consistent color palette across her feed. She recolors clothing items to fit her brand colors even when wearing borrowed pieces.
This creates visual cohesion that increases engagement and follower retention.
Catalog Production
Print and digital catalogs need every product shown in available colors.
Traditional photography requires separate shots for each variant. This multiplies model fees, studio time, and styling costs.
AI recoloring reduces this to one shoot with comprehensive color generation in post-production.
Choosing the Right AI Tool for Your Workflow
I've tested both expensive enterprise solutions and free online tools.
The right choice depends on your specific needs.
Free Online Editors
Best for occasional use, small batches, and testing before committing to paid tools.
Most free tools limit image resolution or add watermarks. Some restrict how many images you can process per day.
The quality from top free tools matches paid options for standard use cases. You sacrifice speed and batch processing capabilities.
Subscription-Based Platforms
Professional tools cost $20-$80 per month.
They offer batch processing, API access, and priority processing speeds. Some include additional features like background removal and image upscaling.
Worth the cost if you process more than 50 images monthly. The time savings justify the expense.
One-Time Purchase Software
Desktop applications with lifetime licenses range from $100-$300.
These work offline and don't require internet connectivity. Good for sensitive projects with confidentiality requirements.
The AI models don't update as frequently as cloud-based tools. You might miss improvements in algorithm accuracy.
Advanced Techniques for Complex Scenarios
Standard AI processing handles most situations, but some images need extra attention.
Multi-Garment Color Coordination
When changing colors on multiple clothing items in one image, process them sequentially.
Change the primary garment first, export the result, then upload and process the secondary item.
This prevents the AI from accidentally selecting multiple items when you want to modify just one.
I keep a spreadsheet tracking which colors go on which items for complex multi-garment images.
Patterned and Printed Fabrics
Clothing with prints, stripes, or patterns requires careful intensity control.
The AI attempts to preserve pattern contrast while shifting the base color. Too much intensity destroys pattern definition.
Start at 40% intensity and increase gradually until you achieve the desired shift without losing pattern clarity.
Some patterns won't accept certain color shifts naturally. A red floral print won't successfully shift to blue without looking artificial.
Transparent and Reflective Materials
Sheer fabrics and highly reflective materials like sequins or metallics challenge AI algorithms.
The transparency allows background colors to influence the garment appearance. The AI sometimes recolors background elements visible through the fabric.
For these materials, I use lower intensity settings and accept more subtle color shifts. Dramatic changes look fake on transparent or reflective surfaces.
Frequently Asked Questions
Can AI change clothing color without affecting skin tone?
Modern AI tools use computer vision to distinguish fabric from skin automatically. The algorithms identify texture patterns, color ranges, and edge boundaries to separate garments from body parts. Quality tools maintain accurate skin tones while modifying only the selected clothing item. Lower-quality processors sometimes create color bleed at fabric-skin boundaries, requiring manual cleanup.
What image formats work best for AI clothing color changes?
High-resolution JPG, PNG, and WebP formats all work well with AI clothing editors. Images should be at least 1500-2000 pixels on the longest dimension for professional results. RAW files provide maximum detail but need conversion to standard formats first. Avoid heavily compressed images under 1MB as they contain artifacts that become more visible after AI processing.
How long does AI clothing recoloring take per image?
Most AI tools process standard lifestyle photos in 3-15 seconds depending on image size and server load. Upload and download time adds another 10-30 seconds per image. Total workflow time including preview and export runs 2-3 minutes per image. Batch processing multiple images simultaneously reduces per-image time to under 1 minute for large projects.
Does changing clothing color reduce image quality?
AI processing maintains original image resolution and doesn't inherently reduce quality. The recoloring algorithm modifies color values while preserving pixel structure and detail. However, aggressive color shifts can flatten subtle texture details or create banding in gradient areas. Using moderate intensity settings and starting with high-quality source images prevents quality degradation.
Can you change clothing color on vintage or low-quality photos?
AI tools can process older images but results depend on source quality. Photos with grain, scratches, or fading may show enhanced imperfections after color changes. Low-resolution vintage images lack detail for the AI to preserve during processing. For best results with older photos, use AI upscaling tools first to improve resolution, then apply color changes to the enhanced version.
Stop Wasting Time on Manual Color Editing
I've saved over 200 hours this year alone by switching to AI-powered clothing recoloring.
The technology handles 85% of my projects with zero manual intervention. The remaining 15% need minor touchups that take 5 minutes instead of the 20+ minutes full manual editing required.
My clients can't tell which images I edited with AI versus Photoshop. They only notice I deliver finished work faster.
Start with simple solid-colored garments on clean backgrounds. Build your skills on straightforward images before tackling complex scenarios.
Ready to cut your editing time by 90%? Try change clothing color in lifestyle photos ai on your next batch of campaign images and see the difference yourself.


