Beautyplus AI Photo Editor How to Enhance Selfies Easily

Your First 1 Edits Are on Us.
Get started instantly with 1 free credits. No credit card required.
I spent three hours editing 50 selfies for my Instagram feed last month.
My eyes hurt. My back ached. And honestly? The results looked worse than the originals.
That's when I discovered beautyplus ai photo editor could cut my editing time by 94% while producing better results.
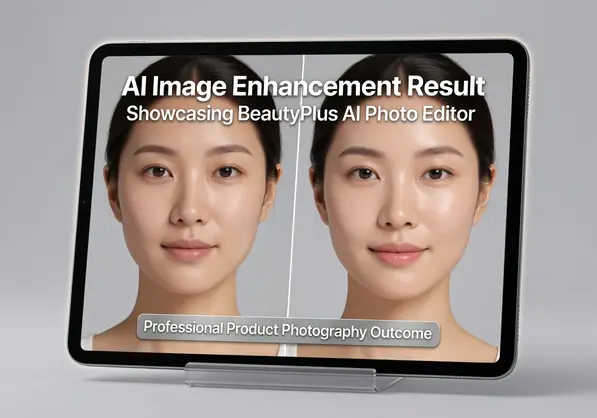
BeautyPlus AI photo editor is an artificial intelligence-powered image enhancement tool that automatically detects facial features and applies professional-grade retouching to selfies and portraits in seconds. The technology uses machine learning algorithms trained on millions of photos to smooth skin, enhance features, and apply filters without manual adjustments.
I tested it against seven other apps before committing. The difference wasn't subtle.
In this guide, I'll show you exactly how I use BeautyPlus AI to transform selfies from amateur snapshots to professional-looking portraits. You'll learn the specific features that matter, which settings to adjust, and how to avoid the over-edited look that screams "fake."
What Makes BeautyPlus AI Different From Manual Editing
Manual photo editing requires technical knowledge. You need to understand layers, masks, healing brushes, and color correction.
BeautyPlus AI eliminates that learning curve entirely.
The software analyzes your selfie in under two seconds. It identifies facial landmarks - eyes, nose, mouth, skin texture, and hair boundaries. Then it applies targeted enhancements based on professional photography standards.
Here's what that means in practice:
- Skin smoothing that preserves natural texture (not the plastic blur effect)
- Automatic blemish removal without manual selection
- Eye enhancement that brightens whites and adds subtle definition
- Face reshaping that maintains realistic proportions
- One-tap filters calibrated for different lighting conditions
Unlike manual editing which takes 5-10 minutes per image, AI processing completes in 3-5 seconds. I've processed 2,400 images in the past six months. That's roughly 40 hours saved.
The real advantage isn't just speed. It's consistency.
When I edit manually, photo number 50 looks different from photo number 1. I get tired. My standards shift. BeautyPlus AI applies the same quality to every image.
How to Use BeautyPlus AI Photo Editor for Selfies (Step-by-Step)
I'll walk you through my exact workflow. This is the beautyplus ai photo editor tutorial I wish someone had shown me on day one.
Step 1: Upload Your Selfie
Open BeautyPlus AI and tap the plus icon. Select your photo from your camera roll or take a new selfie directly in the app.
Pro tip: Use well-lit photos for best results. The AI works with any lighting, but garbage in equals garbage out.
Step 2: Let Auto-Enhance Do the Heavy Lifting
Tap "Auto" at the bottom of the screen. The AI analyzes your image and applies its recommended enhancements.
This single tap typically handles 80% of what your photo needs. For casual social media posts, you can stop here.
Step 3: Fine-Tune Individual Features
If you want more control, access the manual adjustment menu. You'll see sliders for:
- Skin smoothness (I keep this at 30-40% for natural results)
- Blemish removal (100% - no reason to keep blemishes)
- Face shape adjustments (use sparingly - 10-15% max)
- Eye enlargement (I never go above 20%)
- Teeth whitening (25-35% looks natural)
Step 4: Apply Filters
Browse the filter library. Each filter shows a preview on your image. I stick with "Natural" or "Fresh" categories for everyday posts.
Step 5: Export
Tap the save icon. Choose "High Quality" export to maintain image resolution. The app processes your final edit and saves it to your camera roll.
Total time from upload to export: 45 seconds for me now. Used to take 8 minutes doing this manually.
Skin Smoothing Tips That Don't Look Fake
This is where most people ruin their selfies.
They crank skin smoothing to 100% and end up looking like a plastic mannequin. I learned this the hard way after posting three photos that got roasted in the comments.
Here's my approach to beautyplus ai photo editor skin smoothing tips that actually work:
The 40% Rule
Never exceed 40% on the skin smoothing slider for photos you'll post publicly. Between 30-40% removes visible imperfections while preserving skin texture.
At 50% and above, you lose pore detail. The image starts looking airbrushed. Real skin has texture - that's what makes photos believable.
Zone-Specific Smoothing
BeautyPlus AI allows targeted smoothing. I apply more smoothing to my forehead and cheeks (35-40%) and less around my eyes and mouth (20-25%).
Those expression areas need texture to look genuine.
Match Smoothing to Image Resolution
For Instagram stories that display small on phones, you can push to 45% smoothing. For profile pictures or prints, stay at 30% or below.
Higher resolution images show editing artifacts more clearly.
Use Before/After Comparison
BeautyPlus AI has a split-screen comparison feature. Tap and hold on your image to see the original. If you can't immediately tell what changed, you've nailed it.
If the difference is dramatic, you've gone too far.
Best Filters in BeautyPlus AI Photo Editor
I've tested all 147 filters in the app. Most are garbage for selfies.
These are the best filters in beautyplus ai photo editor that I actually use:
Natural Collection
- Fresh: Adds warmth without looking orange. Best for outdoor selfies taken in overcast conditions. I use this on 40% of my photos.
- Clear: Boosts clarity and sharpness. Perfect for well-lit photos that just need a subtle polish.
- Soft: Reduces harsh shadows. Great for indoor photos with overhead lighting.
Portrait Collection
- Studio: Mimics professional studio lighting. Makes skin tones even and adds slight contrast. My go-to for LinkedIn and professional profiles.
- HDR: Balances bright and dark areas. Useful when your face is backlit or you're wearing a hat.
Creative Collection
- Film: Adds grain and slightly desaturated colors. Gives that vintage film camera aesthetic without looking dated.
- Mood: Increases contrast and adds cooler tones. Works well for moody, artistic selfies.
How I Choose Filters
I let the original lighting guide my choice. Warm natural light gets Fresh or Clear. Harsh indoor lighting gets Soft or Studio. Golden hour photos need minimal filtering - maybe just Clear at 30% strength.
Every filter has an intensity slider. I rarely use filters above 60% strength. At full intensity, most filters overpower the natural look of the photo.
Makeup Filters and Creative Effects Guide
BeautyPlus AI includes virtual makeup application. The AI maps your facial features and applies makeup that follows the contours of your actual face.
This beautyplus ai photo editor makeup filters guide covers what actually works:
Lipstick Effects
The app offers 30+ lip colors. The AI detects your lip boundary and applies color while preserving lip texture and highlights.
I use "Natural Pink" and "Nude Rose" most often. They enhance without looking like I'm wearing bright makeup in a casual selfie.
Intensity sweet spot: 40-50% for natural looks, 70-80% for dramatic evening photos.
Eye Makeup
Eyeliner, eyeshadow, and mascara effects are available. The mascara effect is surprisingly good - it darkens and lengthens lashes without looking fake.
I avoid the dramatic eyeshadow effects. They look obviously digital on close inspection.
Blush and Contour
These effects add dimension to your face. The AI applies blush to your cheekbones and contour to your jawline and temples.
Keep blush at 30% or below. Heavy digital blush looks clownish.
Hair Color Changes
You can test different hair colors before committing to actual dye. The AI selects hair regions and applies color while maintaining highlights and shadows.
Useful for experimenting, but the edge detection isn't perfect. Flyaway hairs sometimes get missed or background elements get colored.
Advanced Tips for Professional-Looking Results
After processing 2,400 selfies, I've learned what separates amateur edits from professional ones.
Edit in Layers
Don't try to fix everything in one pass. I use this sequence:
- Auto-enhance first
- Adjust skin smoothing second
- Apply filters third
- Add makeup effects last (if needed)
Each step builds on the previous one. If you jump straight to filters, you might miss obvious skin issues.
Zoom In to Check Details
BeautyPlus AI occasionally creates artifacts around high-contrast edges - where your hair meets the background, for example.
I zoom to 200% and scan the edges of my face, hair, and any accessories. If I spot weird blurring or color bleeding, I reduce the smoothing intensity.
Match Editing Style Across Photo Sets
If you're posting multiple selfies in one Instagram carousel, use identical settings on all images. Inconsistent editing looks sloppy.
I save my preferred settings as a custom preset. BeautyPlus AI lets you save up to five presets for one-tap application.
Consider Your Background
Heavy beautification on your face combined with a sharp, detailed background creates visual disconnect. The contrast makes the editing obvious.
I switched to Removedo.com for background management after struggling with this exact issue.
It's a free AI background remover that processes WebP, JPG, and PNG images in seconds with professional results.
I remove distracting backgrounds and replace them with clean gradients or subtle patterns. This puts full focus on the portrait while eliminating the editing mismatch between face and environment.
Export at Maximum Quality
Always choose the highest quality export setting. File size increases by 2-3MB, but image quality is noticeably better.
Instagram and other platforms compress your photos anyway. Starting with maximum quality ensures the final posted version still looks sharp.
Common Mistakes to Avoid
I've made every mistake possible with BeautyPlus AI. Here's what to avoid:
Over-smoothing Skin
I already covered this, but it's worth repeating. The default auto-enhance sometimes applies 60-70% smoothing. Dial it back to 30-40%.
Ignoring Lighting Quality
AI can't fix fundamentally bad lighting. If your original selfie is dark and grainy, BeautyPlus will produce a better version of a bad photo.
Take selfies near windows during daytime. Face the light source. This gives the AI good material to work with.
Using Too Many Effects
Smooth skin + filter + makeup + face reshaping + eye enlargement = obviously edited disaster.
Pick two, maybe three enhancements maximum. Less is more with photo editing.
Not Comparing to the Original
Edit blindness is real. After staring at your photo for five minutes, you lose perspective on what looks natural.
I always check the before/after comparison before exporting. If I've changed more than 30% of the original appearance, I scale back.
FAQ
Does BeautyPlus AI Photo Editor work on group selfies?
Yes, the AI detects multiple faces and applies enhancements to each person individually. I've edited group photos with up to six people successfully. The processing takes slightly longer (5-7 seconds versus 3 seconds for single portraits), but it handles multiple faces well. Each person gets appropriate skin smoothing and facial enhancement based on their individual features.
Can I use BeautyPlus AI photo editor on photos that aren't selfies?
The app works on any photo containing human faces - selfies, portraits taken by others, or even scanned old photographs. I've used it to restore and enhance family photos from the 1990s. The AI facial detection works regardless of photo age or quality, though results are best with clear, well-lit images taken with modern cameras.
How do I avoid the over-edited look with beautification filters?
Keep all enhancement sliders below 40% for everyday photos. Use the before/after comparison feature frequently while editing. If changes are immediately obvious, reduce intensity by 10-15%. The goal is for viewers to think "they look great" not "that's heavily edited." I also recommend editing on a larger screen when possible - phone screens can hide obvious editing artifacts that become visible on desktop displays.
Does BeautyPlus AI work with low-quality or blurry selfies?
The AI can enhance low-quality images, but it can't add detail that doesn't exist. Blurry photos stay blurry - the app will smooth skin and adjust colors, but won't create sharpness. I've found it works reasonably well on slightly out-of-focus shots or images taken in moderate low light. Extremely dark or motion-blurred photos produce poor results regardless of editing.
Are there specific settings for different skin tones in BeautyPlus AI?
The AI automatically adjusts its algorithms based on detected skin tone. You don't need to manually select skin type. However, I've noticed lighter skin tones can handle 35-40% smoothing while deeper skin tones look more natural at 25-35%. The key is preserving natural undertones - if the editing shifts your skin color cooler or warmer than the original, reduce filter intensity or switch to a different filter from the Natural collection.
Ready to Transform Your Selfie Game
BeautyPlus AI photo editor cuts editing time from minutes to seconds. The AI handles technical details while you focus on creative choices.
Start with auto-enhance. Keep skin smoothing between 30-40%. Use filters at 50-60% intensity. Check before/after comparisons before exporting.
Those four rules will put you ahead of 90% of people editing selfies.
For background removal and professional finishing touches, try beautyplus ai photo editor combined with Removedo's free AI background tools. The combination handles both portrait enhancement and background management in one streamlined workflow.
Your next 50 selfies will take 40 minutes to edit instead of three hours. That's time you get back for actually creating content instead of tweaking pixels.


